Hello World: step by step tutorial
This document describes how to create a simple Hello World microservice with XComponent.
It gives new users a quick overview of XComponent tools.
Overview
XComponent is a platform to create, monitor and share microservices.
In the Hello World sample we are going to create two different pieces of software:
[Hello World microservice]- A microservice that receives say hello requests[Console Application]- A simple application to test our microservice
Install XComponent Community
The easiest way to install the XComponent Commmunity Edition is to download the latest version from Nuget
Create your first microservice
Create a new XComponent project
-
Start XCStudio
[packages\XComponent.Community\tools\XCStudio\XCStudio.exe] -
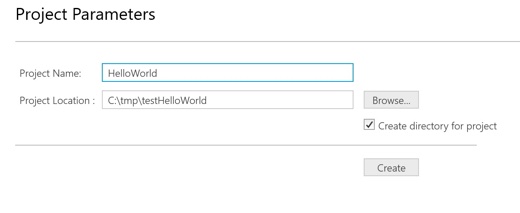
Create a new project named
HelloWorld:
Note: By default, a client API is already created (see following figure).
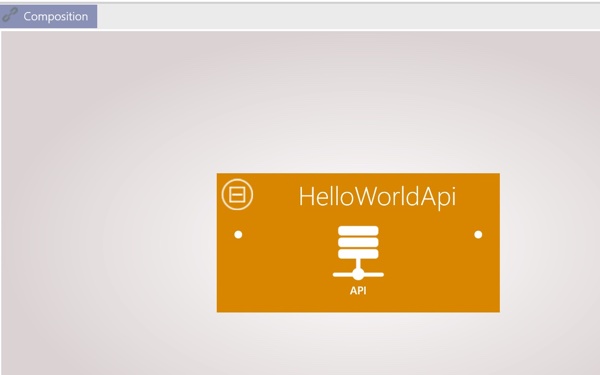
A client API enables you to define how client applications interact with your microservices.
Note: In XComponent, a microservice is a set of components.
Create your first component
- Create a new component named
HelloWorld:

Note: In XComponent, a component is a set of state machines.
- Implementation of this new component
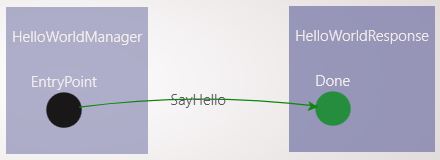
- Rename the automatically created HelloWorld to HelloWorldManager
- Add a new state named Done by double clicking in the designer view (a state and its state machine are created)
- Rename the automatically generated StateMachine2 to HelloWorldResponse
- Add a transition named SayHello from EntryPoint to Done
You should end up with the following component:
- Display the Add new class panel: Window menu + Add new class item
- Select the SayHello transition and generate a class named SayHello containing a string property named Name (click on the AddAndSet button to generate the class and to associate it with our transition)
Note: We have to define events to trigger each transition (an event is represented by a C# class)
- Select the HelloWorldResponse state machine and generate a class named HelloWorldResponse containing a string property named Value (click on the AddAndSet button to generate the class and to associate it with our state machine)
Note: Each state machine can be linked to an object called Public Member. It is important to point out that an event notification (based on the public member) is published when the state of the state machine is updated.
- Now, we want to add a custom action (code) on the Done state when the SayHello transition is triggered. Just select the Done state and select Native C# option of the triggered method called SayHello (see the following figure)

- Build your component (Build menu)
- Edit triggered methods in Visual Studio (Component menu and Edit in visual studio sub item)
- Open the following file:
HelloWorldResponseTriggeredMethod - Add the following implementation to the ExecuteOn_Done_Through_SayHello method:
helloWorldResponse.Value = "Hello " + sayHello.Name;Note: As XComponent is a message driven platform, you have to create an answer wrapped in the public member of the state machine response.
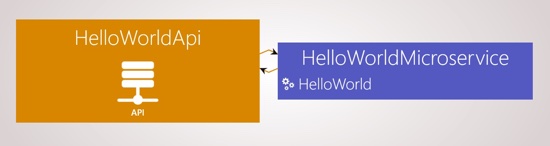
Create your composition
- Go back to the composition view
- Add links between your component and the default api.
- A link to enable the api to send events to the entrypoint state
- A link to receive response notifications
You should end up with the following figure:
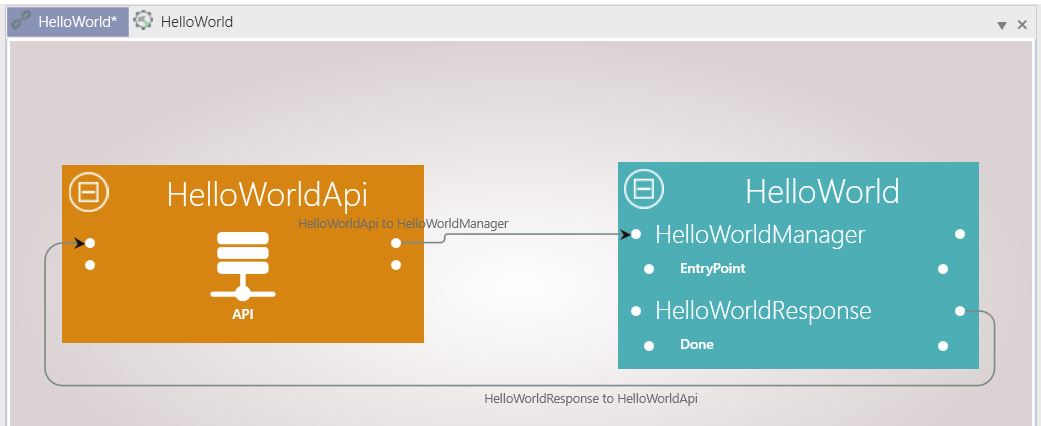
Note: In the composition view, component inputs are the left bullet points and component outputs are the right bullet points.
Configuration
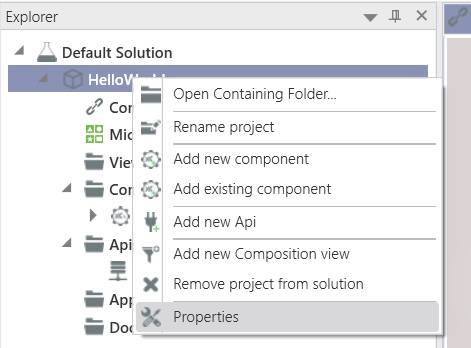
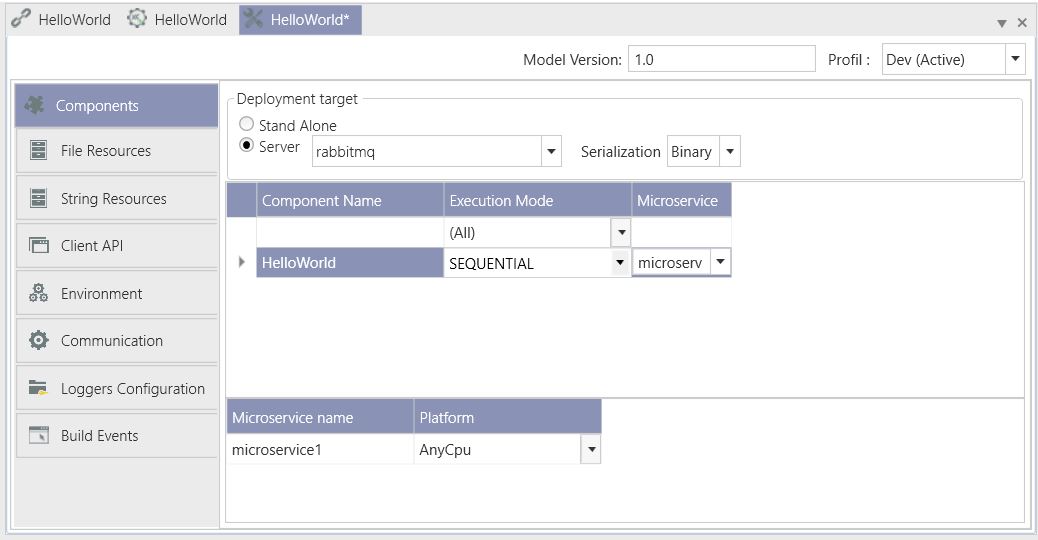
- Open the properties window of your project (see following figure)
- Add rabbitmq settings:
In the Communication section choose a name for the rabbitmq bus and click on the Add button. You should see your bus with a green indicator as in the following figure:

- Set the deployment target to server
In the Components section change the Deployment Target from Stand Alone to Server. In the drop down you should see the previously configured rabbitmq bus.
Microservices composition
- In Explorer panel, double click on microservices composition
- Rename your microservice (containing your HelloWorld component) to HelloWorldMicroservice
Note: To rename a microservice, just right click on its name and select rename microservice.
Test your microservice
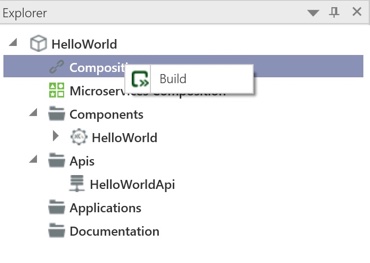
- Build your project (see following figure)
- Start your microservice (Project menu + Run sub menu + Microservices button and then the Start button)
- Create a simple console application to test your microservice (Project menu + Generate Applications sub menu + Console App button)
- Copy/Paste the following code in Program.cs
using System;
using XCClientAPICommon.ApiExtensions;
using XCClientAPICommon.Client;
using XComponent.HelloWorld.HelloWorldApi;
using XComponent.HelloWorld.UserObject;

namespace HelloWorldClientApplication
{
    class Program
    {
        static void AnalyseReport(InitReport report)
        {
            if (!string.IsNullOrEmpty(report.Message))
            {
                Console.WriteLine("Init failed : {0}", report.Message);
            }
            foreach (var componentName in report.ComponentsInitSucceeded)
            {
                Console.WriteLine("Init succeeded : {0}", componentName);
            }
            foreach (var componentName in report.ComponentsInitFailed)
            {
                Console.WriteLine("Init failed : {0}", componentName);
            }
        }

        private static string GetName()
        {
            Console.WriteLine("Enter your name / or enter to exit");
            return Console.ReadLine();
        }

        static void Main(string[] args)
        {
            // Initialize the interfaces
            using (var myhelloworldApi = new ApiWrapper<HelloWorldApi>())
            {
                ClientApiOptions clientApiOptions = new ClientApiOptions(); //fill this object to override default xcApi parameters

                myhelloworldApi.Api.HelloWorld_Component.HelloWorldResponse_StateMachine.InstanceUpdated += instance => Console.WriteLine(instance.PublicMember.Value);

                if (myhelloworldApi.Init(myhelloworldApi.Api.DefaultXcApiFileName, clientApiOptions))
                {
                    var context = myhelloworldApi.Api.HelloWorld_Component.GetEntryPoint().Context;

                    var name = GetName();
                    while (!string.IsNullOrWhiteSpace(name))
                    {
                        myhelloworldApi.Api.HelloWorld_Component.HelloWorldManager_StateMachine.EntryPoint_State.SayHello(context, new SayHello { Name = name });
                        name = GetName();
                    }
                }
                else
                {
                    AnalyseReport(myhelloworldApi.Report);
                }
            }
        }
    }
}
Note: this simple code enables you to send SayHello requests and listen to answers.
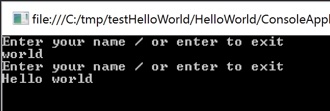
- Run your console application. You should end up with the following output:
Questions?
If you have any questions about this sample, please create a Github issue for us!